How to Install Fence Posts — Step-by-Step DIY Guide
Fence posts are the foundation of every fence. If the posts are plumb, properly spaced, and solidly anchored, the rest of the build goes smoothly. If they are off — even by half an inch — every rail, board, and panel will fight you. This guide walks through the complete process from initial layout to curing, with specific measurements, tool recommendations, and the mistakes that cause the most rework.
Tools & Materials
Gather everything before you start. Running to the hardware store mid-project with wet concrete in your post holes is a recipe for crooked posts.
Tools
- Post hole digger (manual) or power auger (rental: $50-75/day)
- 4-foot level (a post level that straps on is even better)
- Tape measure (25 ft minimum)
- Mason line and wooden stakes
- Shovel and tamping bar
- Wheelbarrow for mixing concrete
- Spray paint for marking hole locations
- Speed square or combination square
- Reciprocating saw (for cutting posts to height)
- Safety glasses, work gloves, ear protection for power auger, and dust mask when cutting pressure-treated wood
Materials
- Fence posts — 4x4 or 6x6, 8 ft long (for 6 ft fence height)
- Quick-set concrete mix — 2 bags of 50-lb Quikrete Fast-Setting per 4x4 post, 3 bags per 6x6
- Gravel — 1/3 cubic foot per hole for drainage base
- 2x4 lumber for temporary braces
- Deck screws for bracing (3-inch)
- Water source (hose within reach of all holes)
Not sure how many posts you need? Use our fence calculator to get an exact count based on your fence length and spacing, or check the concrete for fence posts guide for bag-count calculations.
Step 1 — Mark Your Layout
Start by driving wooden stakes at every corner, end, and gate location. Run mason line tightly between each pair of stakes — this line represents the face of your fence (the flat side that faces outward). Make sure the line is taut; even a small sag will compound into misalignment over a long run.
With the mason line in place, measure from one end and mark each post location with spray paint on the ground. Standard spacing is 8 feet on center for wood fences and 6 feet for vinyl panels. Mark the center of each post hole, not the edge. Double-check by measuring back from the far end — if the total does not divide evenly, adjust the last section rather than changing your spacing.
For gate openings, measure the gate width plus 3/4 inch on each side for hinge and latch clearance. For a standard 42-inch walk gate, the distance between the insides of the gate posts should be 43.5 inches.
Step 2 — Call 811 (Dig Safe)
This step is non-negotiable. Call 811 at least three business days before you plan to dig. The service is free and federally mandated. A locator will come to your property and mark the approximate location of underground gas lines, electric cables, water pipes, sewer lines, and cable/telecom conduits with color-coded paint or flags.
Why it matters: Hitting a gas line can cause an explosion. Hitting an electric line can kill you. Hitting a water line means a flooded yard and a plumber's bill. Hitting a fiber optic line means an angry telecom company and a repair bill of $1,000 or more. None of these outcomes are worth saving three days of planning time.
Note that 811 only marks public utility lines. Private lines — such as sprinkler systems, landscape lighting, or a septic system's drain field — are your responsibility to locate. If you have a sprinkler system, trace the lines before you dig. A $20 irrigation line locator from a rental center can save you hundreds in repairs.
Step 3 — Dig Post Holes
The standard rule is to dig each hole three times the width of the post and one-third the total post length deep. For a 4x4 post on an 8-foot length going into a 6-foot fence, that means:
- Hole diameter: 10 to 12 inches (3 × 3.5 inches actual width)
- Hole depth: 24 inches minimum (30-36 inches in cold climates with deep frost lines), plus 4 inches for gravel base
For a more detailed treatment of depth requirements across different fence heights, soil types, and frost line depths, see our fence post depth guide.
A manual post hole digger works fine for 5 to 10 holes in soft soil. Beyond that, or in clay or rocky ground, rent a power auger. A two-person gas auger rents for $50 to $75 per day and will dig 20 to 30 holes in a few hours. One-person electric augers are available but lack the torque for dense clay. Check for overhead power lines before using a power auger or raising long posts.
After digging each hole, toss in about 4 inches of gravel and tamp it flat. This creates a drainage layer that keeps water from pooling at the base of the post, which is the number one cause of premature post rot in wood fences.
Step 4 — Set Corner & End Posts First
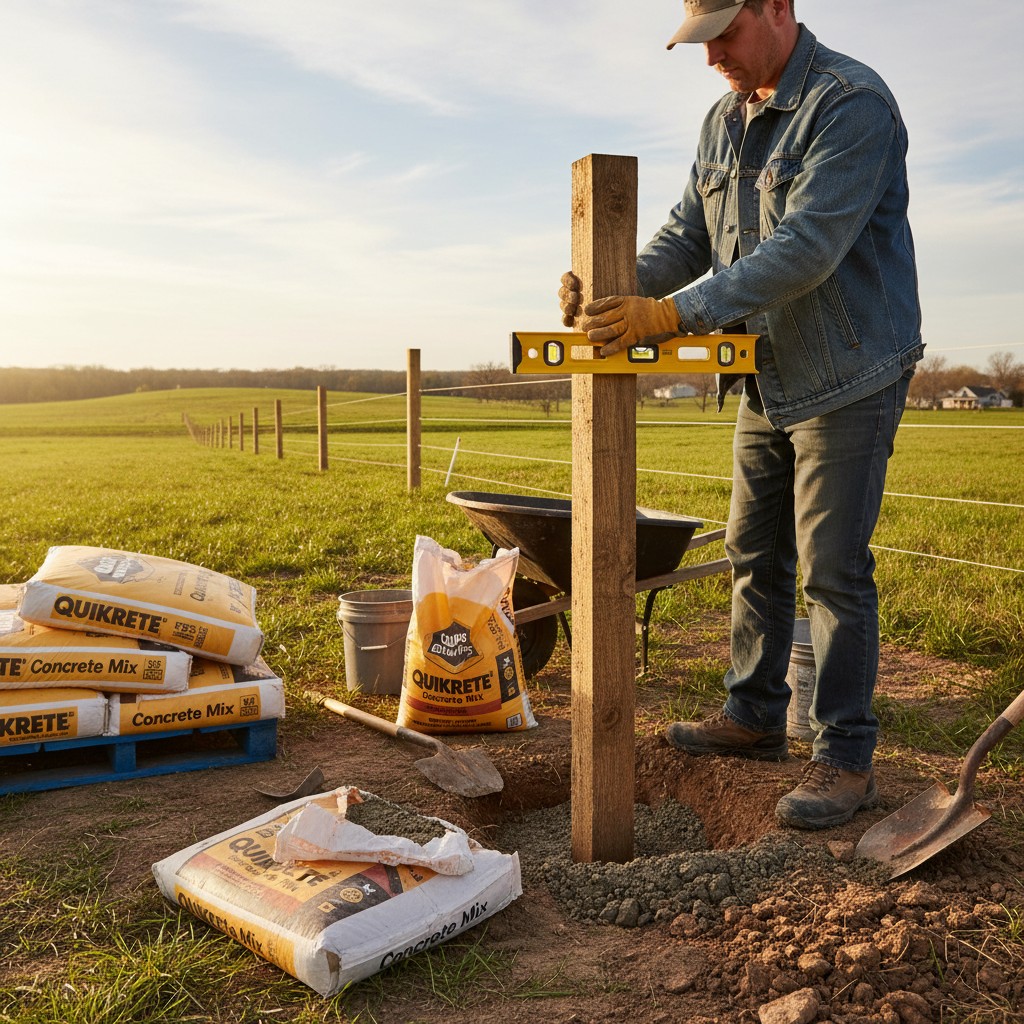
Always set your corner and end posts first. These are your reference points — every line post between them will be aligned to them. Place the post in the hole on top of the gravel base. Check plumb on two adjacent faces with your level. When the post reads plumb on both axes, screw temporary 2x4 braces from the post to stakes in the ground to hold it in position.
Once braced, pour dry quick-set concrete mix around the post, filling the hole to within 3 to 4 inches of ground level. Add water per the bag directions (typically 1 gallon per 50-pound bag). The concrete will begin to firm in 20 to 40 minutes. Re-check plumb after adding water — the weight of the wet concrete can shift the post slightly.
Crown the concrete above grade by 1 to 2 inches and slope it away from the post on all sides. This sheds rain away from the post base rather than funneling it down against the wood.
Step 5 — Set Line Posts
Once the corner and end posts are braced and concrete has begun to set (at least one hour), run a mason line between them at the top. This line gives you both alignment (left-right) and height for every line post in between.
Set each line post the same way: drop it in the hole on the gravel base, check that the top of the post just touches (but does not push against) the mason line, check plumb on two faces, brace it, fill with concrete, and crown above grade. Work your way from one end post toward the other.
If the ground slopes, you have two options. You can step the fence (keeping posts vertical and adjusting rail heights at each section) or follow the grade (angling each section to parallel the slope). Stepping looks better on moderate slopes and is easier to build. Following the grade works better on gentle, consistent slopes. Either way, all posts must be individually plumbed vertically — never angle a post to match a slope.
Step 6 — Concrete vs Gravel Fill
Most builders use concrete, but gravel (also called "dry pack" or "tamped aggregate") is a legitimate alternative in certain situations.
| Factor | Concrete | Tamped Gravel |
|---|---|---|
| Holding strength | Excellent — immovable once cured | Good — adequate for most fences |
| Drainage | Poor — traps moisture at post base | Excellent — water drains freely |
| Post longevity | Can promote rot if water pools at top of concrete collar | Better long-term drainage may extend post life |
| Future removal | Very difficult — concrete footing must be dug out | Easy — post lifts out once gravel is loosened |
| Cost per post | $8 – $14 (2-3 bags of 50-lb) | $3 – $6 |
| Best for | Gate posts, tall fences, wind-prone areas | Line posts, sandy/well-drained soil, temporary fences |
A common hybrid approach is to use concrete for corner, end, and gate posts (where maximum strength matters) and tamped gravel for line posts (where drainage benefits wood longevity). If you use gravel, tamp it in 4-inch lifts — dump 4 inches, tamp firmly with a steel tamping bar, repeat until full.
Step 7 — Let Cure Before Attaching Rails
Quick-set concrete reaches initial set in 20 to 40 minutes, but it needs 24 to 48 hours to develop full strength. Do not attach rails, hang panels, or remove braces until the concrete has cured for at least 24 hours. Premature loading shifts posts before the concrete locks them permanently, and once concrete has shifted around a post, you cannot straighten it without breaking the footing out and starting over.
Standard (non-quick-set) concrete mix takes longer — 48 to 72 hours for initial cure and up to 7 days for full strength. If you use standard mix, plan your project timeline accordingly. Quick-set is worth the small premium for most fence projects.
While waiting for concrete to cure, use the downtime productively. Pre-cut your rails to length, sort boards, and lay out hardware. If you are building a full privacy fence, this is a good time to mark rail bracket heights on each post.
Common Post Installation Mistakes
These are the errors that cause the most rework and frustration. Avoid all of them.
- Not checking plumb on both axes. A post can be perfectly plumb left-to-right but leaning forward or back. Always check two adjacent faces before bracing.
- Skipping the gravel drainage base. Without gravel at the bottom of the hole, water collects under the post and accelerates rot. Four inches of gravel takes 30 seconds per hole and adds years to post life.
- Digging too shallow. Posts set less than 24 inches deep will lean within a year or two, especially in freeze-thaw climates where frost heave pushes shallow posts out of the ground. In cold climates, dig below the frost line — that means 36 to 48 inches in the northern United States.
- Setting all posts at once, then concreting. If you set 20 posts loosely in their holes before concreting any of them, you have 20 posts to re-plumb and brace simultaneously. Instead, set and concrete two to three posts at a time, let them firm up, and use them as fixed reference points for the next batch.
- Forgetting to crown the concrete. A flat or concave concrete surface around the post traps rainwater against the wood. Mounding the concrete 1 to 2 inches above grade and sloping it away from the post prevents this.
- Attaching rails too soon. Loading posts before concrete has cured is the single most common cause of leaning fences. Wait 24 hours minimum for quick-set, 48 hours for standard mix.
Related Topics
- Fence Material & Cost Calculator — Calculate posts, concrete bags, rails, and total cost for your project.
- Fence Post Depth Guide — How deep to dig for every fence height, soil type, and frost zone.
- How Much Concrete for Fence Posts? — Exact bag counts for 4x4 and 6x6 posts at different depths.
- How to Build a Privacy Fence — The complete DIY build guide from posts through finishing.